Silhouette of a person sitting in front of a laptop
Photo by Hannah Wei on Unsplash

Since the Covid 19 pandemic started, we’ve seen the whole world start “accepting” remote work - I put accepting in quotes because most companies don’t really embrace it, but don’t have an alternative. With that, I’ve also seen some studies analyzing the results of this “experiment” - stuff like “people who started working remotely in 2020 are x% more/less productive”. Please don’t do that.

Experiments should, by definition, be prepared to run in a controlled environment. Bringing to the software development world, it’s like using a containerized environment: an ephemeral, isolated process, running in its own namespaces. This avoids interferences from outside - like dependencies with different software versions and port conflicts.

We’re living a pandemic. This is the complete opposite of an experiment. If there’s one thing we don’t have any more is control. We don’t control where we can go, what we can do, and we have no idea when this is going to end. And many of us are suffering with mental health issues. That means we can’t compare the productivity of remote workers now with office workers before.

Most people worked physically in their companies offices, close to their co-workers, easily separating work and personal life: you leave home in the morning and start your work; you get back home at the end of the day and you’re back to your personal life. And most of these people work for companies that weren’t prepared for remote work - that means much more than simply closing the offices and sending employers home. All the work experience must change - communication, interactions, meetings, feedbacks. I’m not saying it’s better or worse, it’s just different. So if you try to reproduce the office environment remotely, you’ll probably fail.

My conclusion is that trying to compare productivity from office workers before the pandemic with remote workers during it doesn’t make sense, for two main reasons.

The first one is that an experiment should have a preparation step. If a company decides to start a remote work experiment, it should study how remote companies work, and how they should change their dynamics. And we didn’t have time for this when Covid 19 pandemic started. Some of these people may not have a decent work environment at home; maybe, they live with noisy relatives; maybe they have kids, and now have to handle remote teaching for their kids and adapt them too, changing their lives completely. And besides all that, they still have to be productive at work!

The second reason is that, anywhere you work, this pandemic is messing with everyone’s lives. People are worried, anxious, depressed. People lost their relatives and friends, and may be worried with what could happen to them. And nobody could ever be fully productive with this situation. If you’re suffering with any of these, as most of us are, you should look for professional help, and not blame remote work.

All this shows that, to focus on work, people need to handle their mental health, and it’s hard. Some companies have realized this, and are taking good care of their employees - including Jusbrasil, where I work. But others are more worried about losing productivity when working remotely. Please don’t be one of the latter.


Hallway with doors

When debugging a server problem, you may need to know which ports a specific process opened - or which process is listening on a specific port. There are many ways to do this, using different tools. It may be useful to know more than one, because you may not have every tool available (specially in containerized environments).

Checking if a port is open

The first step is checking if a port is open. The easiest way to do this is using netcat. In this example, there’s an HTTP server running on port 8000:

$ nc -zv localhost 8000
Connection to localhost 8000 port [tcp/*] succeeded!

$ nc -zv localhost 8001
nc: connect to localhost port 8001 (tcp) failed: Connection refused

You can also add a -u flag to check UDP ports.

Another tool you can use to check for open ports is telnet:

$ telnet localhost 8000
Trying 127.0.0.1...
Connected to localhost.
Escape character is '^]'.
^]
telnet> quit
Connection closed.

$ telnet localhost 8001
Trying 127.0.0.1...
telnet: Unable to connect to remote host: Connection refused

Telnet can’t be used to test UDP ports.

Testing HTTP ports

In the specific case of an HTTP server, you can use curl to make requests - -v flags makes the output verbose:

$ curl -v localhost:8000/check
*   Trying 127.0.0.1:8000...
* TCP_NODELAY set
* Connected to localhost (127.0.0.1) port 8000 (#0)
> GET /check HTTP/1.1
> Host: localhost:8000
> User-Agent: curl/7.65.3
> Accept: */*
>
* Mark bundle as not supporting multiuse
< HTTP/1.1 200 OK
< Content-Type: text/html; charset=utf-8
< Content-Length: 2
< ETag: W/"2-4KoCHiHd29bYzs7HHpz1ZA"
< Date: Fri, 13 Sep 2019 21:11:22 GMT
< Connection: keep-alive
<
* Connection #0 to host localhost left intact
OK

When the port isn’t open, you get a Connection refused message:

$ curl -v localhost:8001/check
*   Trying 127.0.0.1:8001...
* TCP_NODELAY set
* connect to 127.0.0.1 port 8001 failed: Connection refused
* Failed to connect to localhost port 8001: Connection refused
* Closing connection 0
curl: (7) Failed to connect to localhost port 8001: Connection refused

You can also make this same request with telnet, if curl is unavailable:

$ telnet localhost 8000
Trying 127.0.0.1...
Connected to localhost.
Escape character is '^]'.
GET /check

HTTP/1.1 200 OK
Content-Type: text/html; charset=utf-8
Content-Length: 2
ETag: W/"2-4KoCHiHd29bYzs7HHpz1ZA"
Date: Fri, 13 Sep 2019 21:16:53 GMT
Connection: close

OKConnection closed by foreign host.

Checking open ports by process

Sometimes you need to check which ports a specific process is listening to. First you need to find out the process id (pid) using ps:

$ ps aux | grep python
ggarnier  8762  0.6  0.0  94900 14928 pts/2    S+   17:31   0:00 python server.py
ggarnier  8789  0.0  0.0  21536  1092 pts/11   S+   17:31   0:00 grep python

The process id is the second column - in this example it’s 8762. Now you can use lsof:

$ lsof -Pan -p 8762 -i
COMMAND  PID     USER   FD   TYPE   DEVICE SIZE/OFF NODE NAME
python  8762 ggarnier    3u  IPv4 13254927      0t0  TCP *:8000 (LISTEN)

In the example above, process 8762 is listening on port TCP 8000.

An alternative command is ss:

$ ss -tulpn | grep "pid=8762"
tcp    LISTEN   0        5                                      0.0.0.0:8000                  0.0.0.0:*            users:(("python"id=8762,fd=3))

You may need to run lsof and ss with sudo if the process is owned by another user.

Checking which process is listening on a port

Finally, if a port is open and you don’t know with process did it, use lsof:

$ lsof -i :8000
COMMAND  PID     USER   FD   TYPE   DEVICE SIZE/OFF NODE NAME
python  8762 ggarnier    3u  IPv4 13254927      0t0  TCP *:8000 (LISTEN)

netstat can also be used. It doesn’t support filtering by port or process, but you can use grep to filter its output:

$ netstat -ntlp | grep 8000
tcp        0      0 0.0.0.0:8000            0.0.0.0:*               LISTEN      8762/python

In both commands, use sudo if you aren’t the process owner.


Raspberry Pi printer server

A few months ago, my wife needed to print a couple of documents. I had an old HP printer (Officejet 4355) sitting around, but I couldn’t use it in her laptop - it’s a Chromebook, which doesn’t support printer drivers. It can only print over the network, and my printer doesn’t have network connection, just USB. The only way I could make that work was installing the printer in another computer and making it share the printer over the network. But I’d have to keep the other computer on and connected to the printer every time she wanted to print something, which isn’t convenient.

So I decided to remove the dust from an old Raspberry Pi (the original model B) I hadn’t used for a while, and use it as a print server! Now I can print from any device, including her Chromebook and my Android phone.

Installation

First install Raspbian (without graphical interface, as you’ll use it only as a server), and set a static IP for it. Then connect the printer to one of its USB ports and install the driver - for my case, I found HP’s Linux Imaging and Printing software (HPLIP). It’s an official HP driver for Linux that supports many old printers, including mine. To install it:

sudo apt-get install hplip

The next step is installing CUPS and adding your user (default user is pi) to lpadmin group:

sudo apt-get install cups
sudo usermod -a -G lpadmin pi

To add a printer to CUPS, open its web interface in http://<pi IP address>:631/admin and click Add Printer. Your printer should be discovered automatically. After selecting it, you can add a meaningful name to it. Also, don’t forget to check Share This Printer before continuing.

With the print server fully configured, you need to setup the printer in each device. In a laptop running Ubuntu, my “new” printer could be automatically discovered. If you have any problem with it, check Debugging Printing Problems. In Chromebook, I installed IPP/CUPS printing extension. And in Android, I’m using CUPS printing app. They all work great!


Code review is an amazing tool to improve code quality. It brings many benefits, to the reviewer, to the reviewee and to the team.

How we do code reviews

To add code reviews to your team workflow, first you need to use a version control tool. If you don’t, start with that.

Basically, the idea is never committing directly to the master branch - or whatever other branch you choose as the main one, but usually it’s the master branch. To start any changes to the source code, be it a new feature, refactorings or bugfixes, you need to create a new branch. You can also create conventions for the branch names, but this is not required.

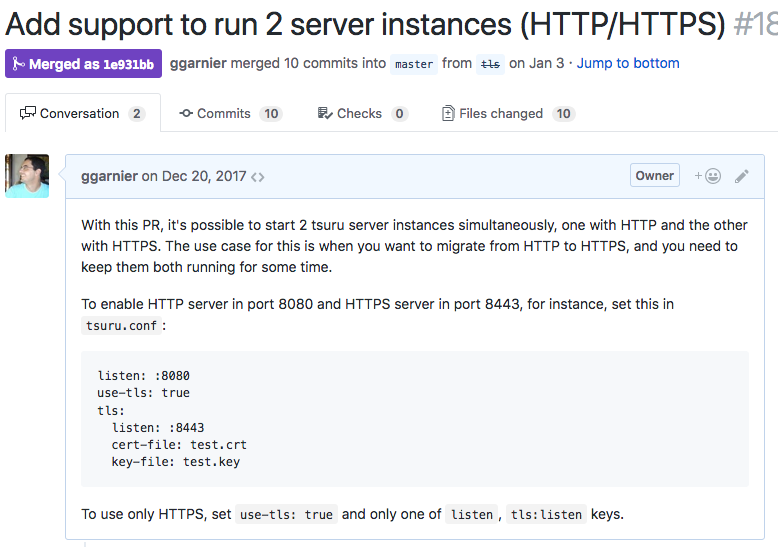
After you finish working on your own branch, you can trigger the code review process. If you use a repository manager like GitHub or GitLab, they already provide tools to help on this process: GitHub calls them pull requests, and GitLab, merge requests - to make it simpler, I’ll call them change requests from now on. You can add some comments explaining the purpose of the proposed changes, and maybe links to other related change requests or issues. These are very important to make the objective of that change request clear for everyone that might review your code. When in doubt, be as specific and clear as you can. Here’s an example from tsuru, the project I currently work in: a pull request with a detailed description.

A pull request with a detailed description

As soon as a change request is created, it’s available for any other member of the team to start reviewing it. You can also assign it to a specific person, if you think his/her opinion is important - maybe when you change a specific and obscure part of the project that not everyone dominates.

As a reviewer, you job is to check many aspects of the code. Here’s a non exaustive reference list:

  • accuracy and completeness: does the code do what it’s supposed to do?
  • bug free: doesn’t it introduce new bugs (like not handling corner cases)?
  • expressiveness: is it clear on its intentions? Can a reader clearly understand the coder’s objectives?
  • scalability: could it handle the expected load?
  • conventions and standards: does it follow the agreed conventions for code style, file and directory structure, etc?
  • tests: do the tests cover all the use cases, including important corner cases? Is there a specific use case that deserves more tests?

After checking the code, the reviewer can basically accept or reject it - GitHub also allows you to add review comments without explicitly approving or rejecting. When you approve, that means you think those changes could be promptly merged to the main branch. But when you reject, that could mean you doesn’t agree with that change at all (e.g. you don’t think this software should have the proposed feature), or that you’re requesting some changes to the code. That’s what review comments are meant for.

Usually a review comment can be added to a specific line or code block. That could be a typo, a function you think should be named differently, a bug you spotted or a missing test or documentation. The comments should make this clear to the reviewee, who can reply to the comments or make requested changes. Then, this process repeats until the change request gets approved.

When the reviewer accepts the proposed changes, the reviewee has two options: merge/rebase the changes to the main branch and finish the code review process, or ask for another developer review. This is the case when the change is very complex and you’re insecure you may be missing something. When this happens, the review process doesn’t finish until all reviewers accept the changes.

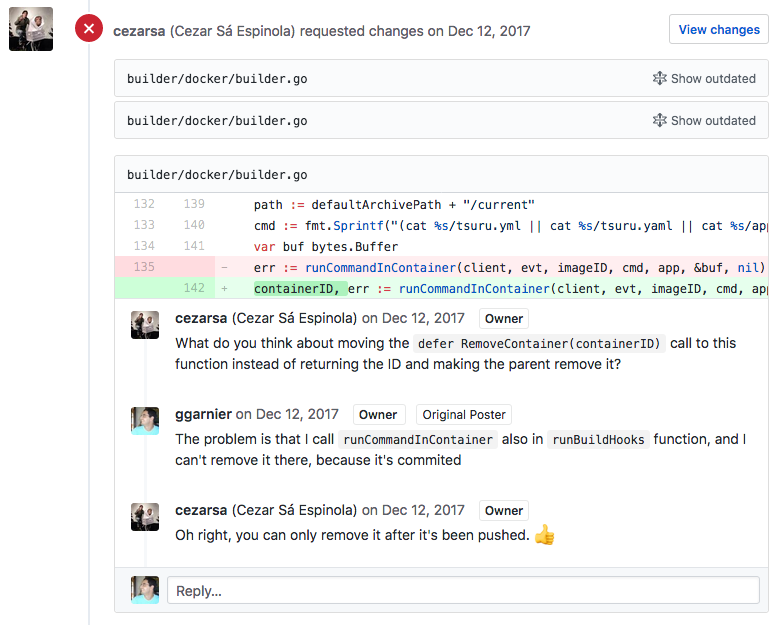
To illustrate, here’s another example of code review from tsuru: in this pull request, I received a couple of comments with request changes. For most of them I changed the code according the suggestions, and one of them generated a small discussion. What’s best is that the discussion is documented in the pull request, for anyone to read and participate.

A pull request discussion

Benefits of the code review

A code review process brings a lot of benefits to the reviewer, to the reviewee and to the team as a whole:

For the reviewer

  • learn about the changes: if someone commits directly on the main branch, only the author would know the details about it. When you review, you also get to know what those changes do, how and why they were written. And if you don’t understand, you have the opportunity to ask for more information
  • learn about the project: if you are new in the team, code review is a great tool to obtain knowledge about the project. Even if you still don’t understand the project, go ahead and review everyone’s code, just to start understanding it a little better
  • learn about the technologies involved (languages, frameworks, libraries): just like when you’re new to the team, if you are getting started with the tech stack used in the project, you’ll benefit even more from reviewing people’s code. You’ll learn about the language’s features, new libraries to solve common problems and features of the frameworks the project uses
  • develop a critical view of someone else’s code: if you are an inexperienced developer, you probably have a hard time trying to spot problems in someone else’s code. After code reviewing a couple of times (and checking other developer’s reviews), you’ll learn how to be more critic. And what’s more important, you’ll learn that criticizing someone else’s code is not offensive, it’s actually a good thing, an opportunity for them to learn. And you’ll learn with the other’s mistakes. That’s why junior devs should review seniors’ commits

For the reviewee

  • learn about the project: just like the reviewer, a great way to start in a new project is asking for feedback from the more experienced in the team. Here’s another example
  • learn about the technologies involved (languages, frameworks, libraries): the same comments from the reviewer part are worth here. Here’s one more example
  • learn other ways to solve problems: when you face a bug, you may already have the complete solution in your head; that solution could really work after you implement it. But that doesn’t mean this is the only way to solve the problem. Probably there are other solutions out there, and they may be simpler, clearer, safer or perform better. Other developers could show these other solutions in their reviews
  • learn to accept critics: sometimes we get so attached to the code we wrote that we could get offended when someone criticizes it. Code reviews help us learn to get over this, because we are explicitly asking for people to give feedback on our code, and they’ll answer. Over time you’ll learn these feedbacks are great ways of learning

For the team

  • shared code ownership: now two or more people are responsible for the code one of them wrote - by the way, that could also be reached with pair programming. Shared code ownership is great after a bug is released into production: the developer who wrote the code is no longer the only responsible for that. This also helps reaching a blameless culture
  • helps keeping standards: if the team agreed on specific conventions, like code style rules, tests for every line of code or document all the APIs, code review is a great way to make people monitor each other on these

Common problems and concerns

Won’t this slow me down?

When we suggest that our team starts working with code reviews, people usually get apprehensive about this process making the team slower. If they’re used to finish their work, push the code and deploy to production, they may have this concern.

In fact, you won’t have that fast dev-to-production cycle. But that is a small downside against the many benefits presented above. It’s a trade-off, like every decision you make in your project.

One common concern is having to wait for a long time for another dev to start the code review process. If people still don’t see value in this process, they indeed may not prioritize this. But as soon as you get to be on the other side - waiting for other people’s reviews -, you’ll start giving it more attention. It’s an organic process that usually regulates itself.

How to handle large change requests?

Another problem is when the change request is very large. This will require more time from the reviewers, and it may be harder to analyze: you may lose focus during the review.

Just like on the previous item, this should be self regulated. If you start making very large change requests, you’ll learn they aren’t much productive when someone else asks for you to review a large change request.

There isn’t an ideal size of change request. But you should make them as small as possible. If you’re working on a complex feature, you may try splitting it in a couple of small change requests, independent from each other. But if you can’t make them independent, an alternative is starting with a branch forked from the main one - you may call it feature-something, then creating other branches from it. As you finish each part, make the change requests to merge to you feature branch, not the main branch. And only when you finish every “sub-feature” change request, only then you merge your feature branch to the main one.

When not to use code reviews?

Finally, another common question is: are there exceptions to the “never commit to the main branch” rule? If the change is very simple and small, won’t the code review process be just a formality?

In fact, there are a couple of situations where you may bypass the code review process. One example is updating a dependency version. But I still think it’s worth opening the change request, to make other team members aware of the changes. But this kind of decision is up to the team, and should be accorded among them.

To finish, I suggest reading this great post about how to conduct effective code reviews.


Tmux is a fantastic tool for improving productivity when working with a terminal. One of the first things people configure when start using tmux is changing the prefix key. The default value is control+b, which is not very confortable to press with a single hand. And as you’ll end up pressing it a lot, for every tmux command, the most common used configuration is changing it to control+a.

This is much better, but you still need to press two keys simultaneously before typing any tmux command. After using this configuration for some time, I decided to change it to a single key, to make it even easier.

I though about changing the prefix to caps lock. Besides being rarely used, it’s very well positioned. However, you can’t set caps lock as prefix in tmux. An alternative solution is mapping the caps lock key to something else. In OSX, you can set it to another modifier key, like control, shift or esc: go to System Preferences => Keyboard => Modifier keys. First I tried mapping it to esc, and setting esc as tmux prefix. It works, but this setup brought another problem: as a vim user, I use the esc key a lot (to alternate between vim modes), so now I had to type esc/caps lock twice to send the esc key to vim. It was ok, but not ideal.

Then I tried another solution: I installed Karabiner-Elements, a Mac app which allows you to completely customize your keyboard. So I mapped the caps lock key to Home (which doesn’t exist in Mac keyboard), and changed tmux prefix key to Home:

set -g prefix Home
unbind C-b
bind-key Home send-prefix

Now I have a great configuration: I use a single key (caps lock) as prefix, and without losing any key functionality.

UPDATE: to do this same configuration in Linux, you just need to open the /usr/share/X11/xkb/symbols/pc file and change the line that starts with key <CAPS> to this:

key <CAPS> {        [ Home          ]       };